AS stduy platform -- qemu
This article will introduce that how to use the qemu to stduy AS on windows, for that on linux, it’s almost the same way.
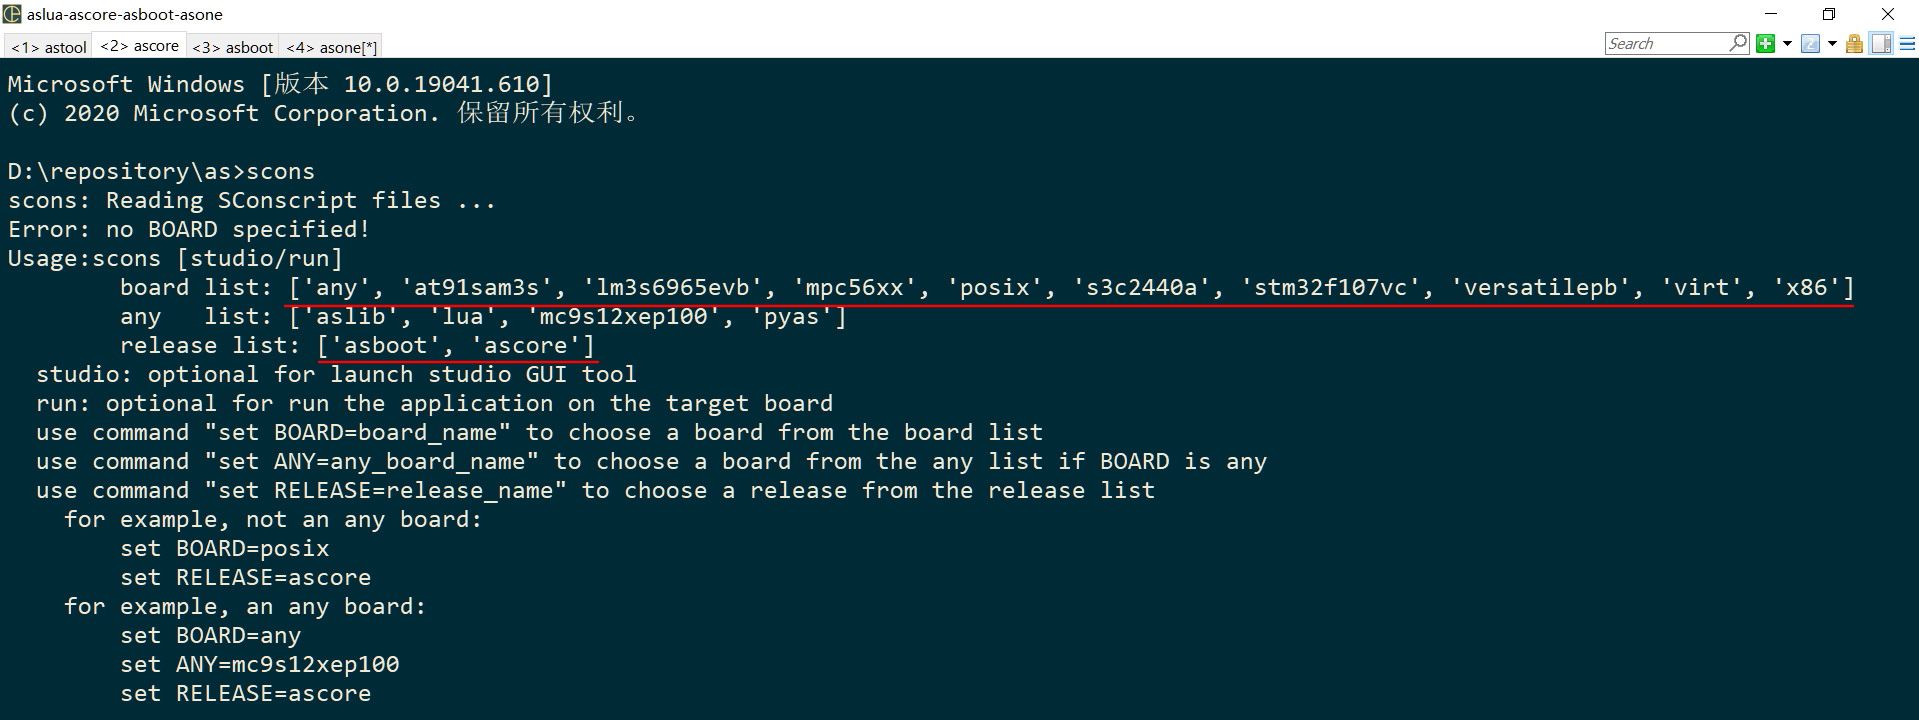
1. AS supported machine list
The virtual qemu machine versatilepb and x86 are the best supported by AS, for the others, it’s legeacy work that now has no any updates, it maybe even not works properly.
1.1 arm926 versatilepb and x86 i386
These 2 are the best supported qemu machines by AS, as that both of them have qemu PCI bus, so it’s very easy to develop some special device base on the qemu PCI bus, the below are 3 devices developed by me but with a limitation that doesn’t support ISR:
- asnet : simulation of the ethernet
- ascan : simulation of the CAN(CANFD)
- asblk : simulation of the storage block device
1.2 arm926 3sc2440a
This is only supported on windows as the qemu machine original precompiled by rtthread maybe, you can use it to study trampoline only, the ASKAR RTOS doesn’t run on this machine as I am lazy that I don’t want to do the porting work as I think versatilepb and x86 are good enough.
1.3 cortex-m3 lm3s6965evb
I didn’t get the dispatch(asm “svc 0”) works now as it may hardfaut, so it can only run cortex-m3 code without ISR and task context switch.
2. Set up environment on windows
This is a struggling processs for some new beginners who are totally not familiar with shell commands as most of people working with IDE.
2.1 install Anaconda3 64bit as C:\Anaconda3
2.2 install msys2 x86_64 as C:\msys64
2.3 then run below commands in cmd
set PATH=C:\Anaconda3;C:\Anaconda3\Scripts;C:\msys64\usr\bin;C:\msys64\mingw64\bin;%PATH%
pacman -Syuu
pacman -S unzip wget git mingw-w64-x86_64-gcc mingw-w64-x86_64-glib2 mingw-w64-x86_64-gtk3
pacman -S mingw32/mingw-w64-i686-gcc mingw-w64-x86_64-diffutils
pacman -S ncurses-devel gperf scons curl make cmake automake-wrapper libtool
pacman -S unrar mingw-w64-x86_64-pkg-config mingw-w64-x86_64-binutils
pacman -S msys2-runtime-devel
conda install scons pyserial
3. How to build ascore and run
This is very easy!
3.1 launch the /as/Console.bat by double click
-
Note: before launch the /as/Console.bat, please make sure 7z is installed as path “C:\Program Files\7-Zip\7z.exe”
-
Note: for the first time build, it will be very slow as it need to dynamic download some packages and tools to directory “/as/release/download”
-
Note: for Ubuntu machine, just build from any shell terminal, and please remember to run below command to enable the AUTOSAR RTE generator.
export PYTHONPATH=/path/to/com/as.tool/config.infrastructure.system/third_party:${PYTHONPATH}
3.2 choose a board want to be used
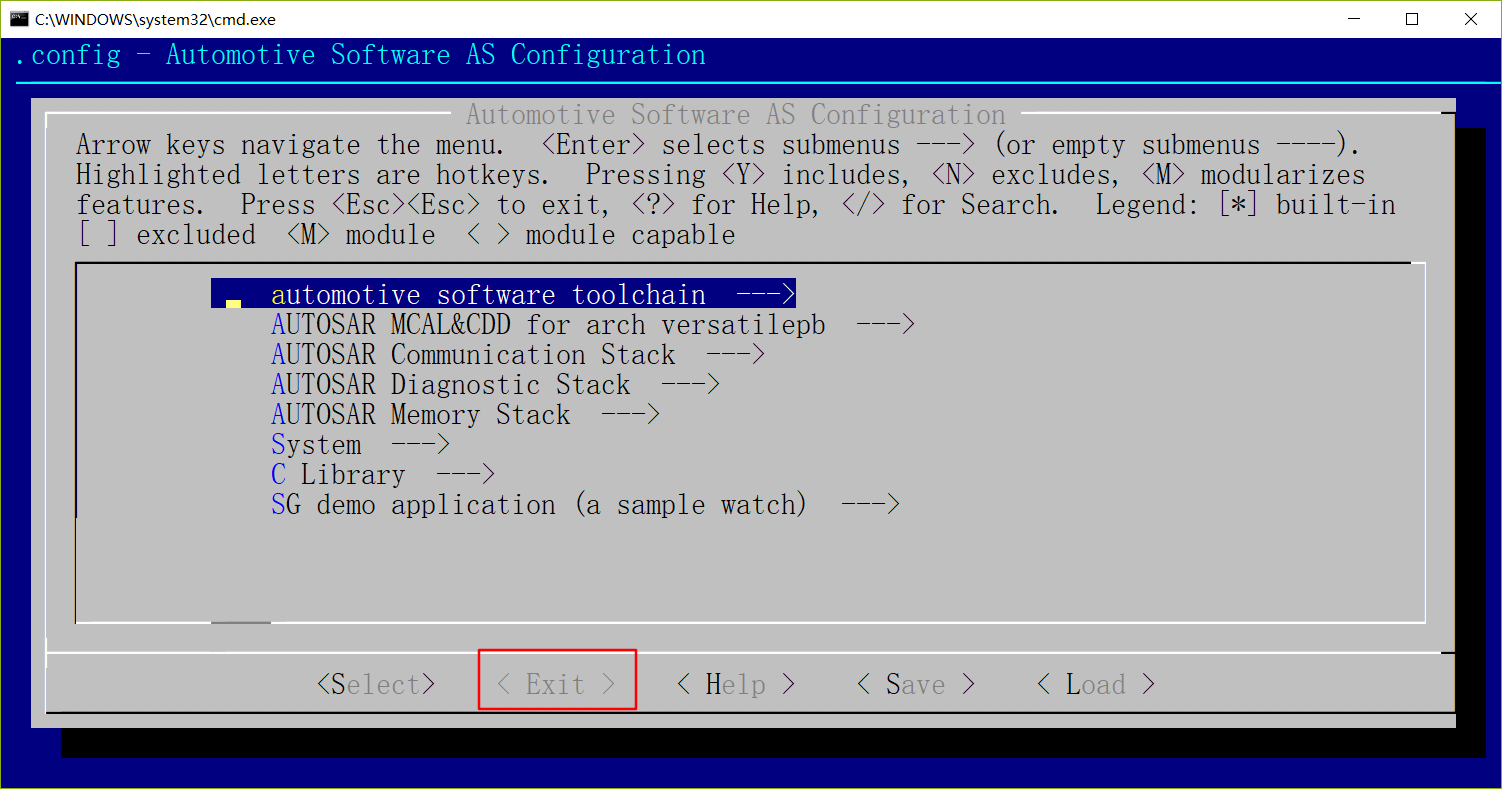
3.3 [optional] do menuconfig by command “scons --menuconfig”
NOTE: this step better to be skipped if you are not familiar with AS.
Generally it’s better to remove the previous config by command “rm .config” when switch the BOARD, and it’s okay to leave all conifig as default.
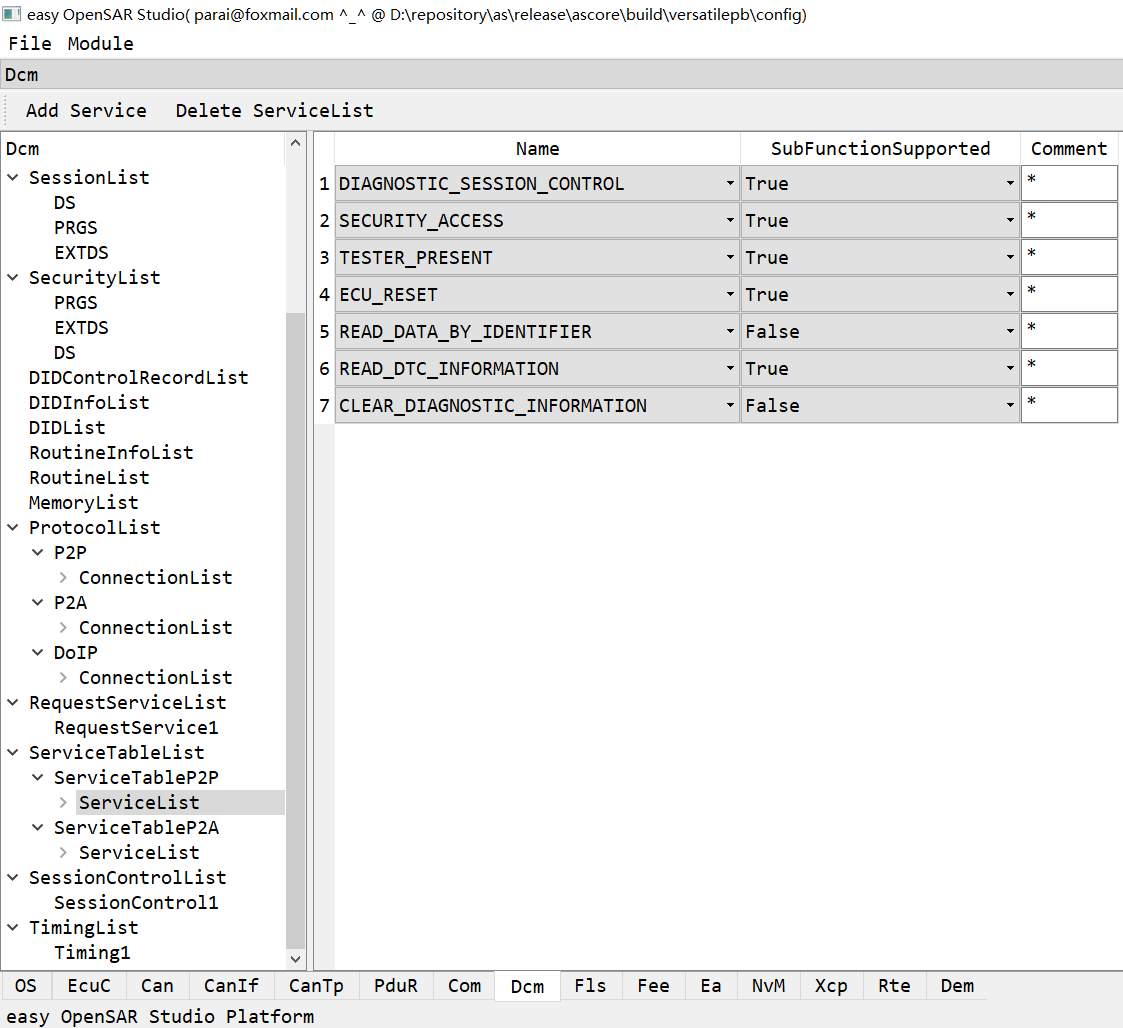
3.4 [optional] do AUTOSAR config by command “scons studio”
- Note: The OS panel is an additional OS configuration to the *.xml OS configuration, you can check the xml files under directory “/as/release/ascore/build/$BOARD/config” for how to add a Task/Alarm/Counter/Resource etc by new a xml or use the OS panel to do OS configuration.
Generally you can leave it as default.
- Note: please modify the macro
PACKET_LIB_ADAPTER_NRofas/com/release/download/lwip-contrib/ports/win32/lwipcfg_msvc.handas/com/as.infrastructure/communication/Pci/pci_asnet.cto the right index of ethernet adapter used. Here as the command ipconfig shows, the VirtualBox Host-Only Network #2 was used and its index is 0, and please make sure to use a virtual network with ip addr=”172.18.0.100”, net mask=”255.255.255.0”, and the gate way=”172.18.0.1”.
#define PACKET_LIB_ADAPTER_NR 0
D:\repository\as\release\ascore>ipconfig

Windows IP

VirtualBox Host-Only Network #2:

   MAC                               : fe80::586:98c5:8a30:4e4c%21
   IPv4 Address                      : 172.18.0.100
   Net Mask                          : 255.255.255.0
   Gateway                           : 172.18.0.1

WIFI WLAN:

   MAC                               : fe80::1577:a1b2:1881:460b%27
   IPv4 Address                      : 192.168.1.103
   Net Mask                          : 255.255.255.0
   Gateway                           : 192.168.1.1
3.5 do build by command “scons” and do clean by command “scons -c”
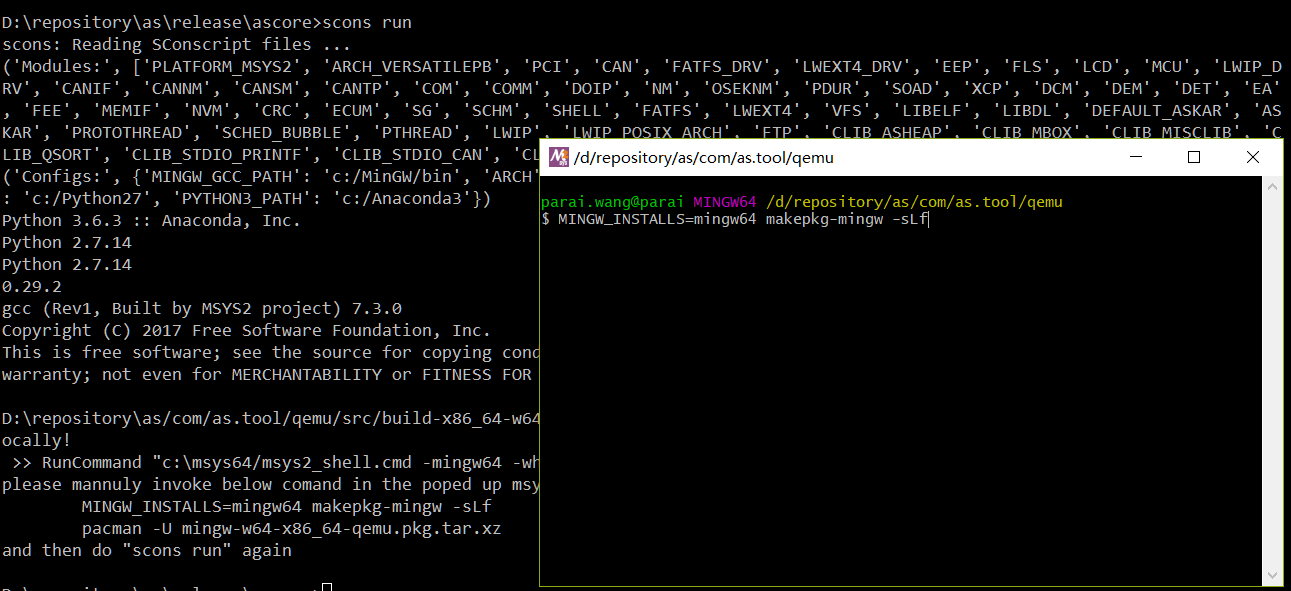
3.6 after build sucessfully, we can run it now by command “scons run”.
For the first time, it will pop up a msys2 windows which its path is “/as/com/as.tool/qemu”, in which the below 2 command should be executed to compile the qemu out and then install it.
MINGW_INSTALLS=mingw64 makepkg-mingw -sLf
pacman -U mingw-w64-x86_64-qemu-2.10.0-1-any.pkg.tar.xz
The below picture gives a demo that how to use FTP to push a file to ascore VFS filesystem(somehow a test of LWIP on OSEK OS) and how to use the ascore libelf to execute the “main” function of a DLL.

3.7 debug by eclipse
3.7.1 firstly, run command “scons run gdb” to launch the qemu machine with gdb server, which waiting the connection from eclipse plugin qemu-dbg
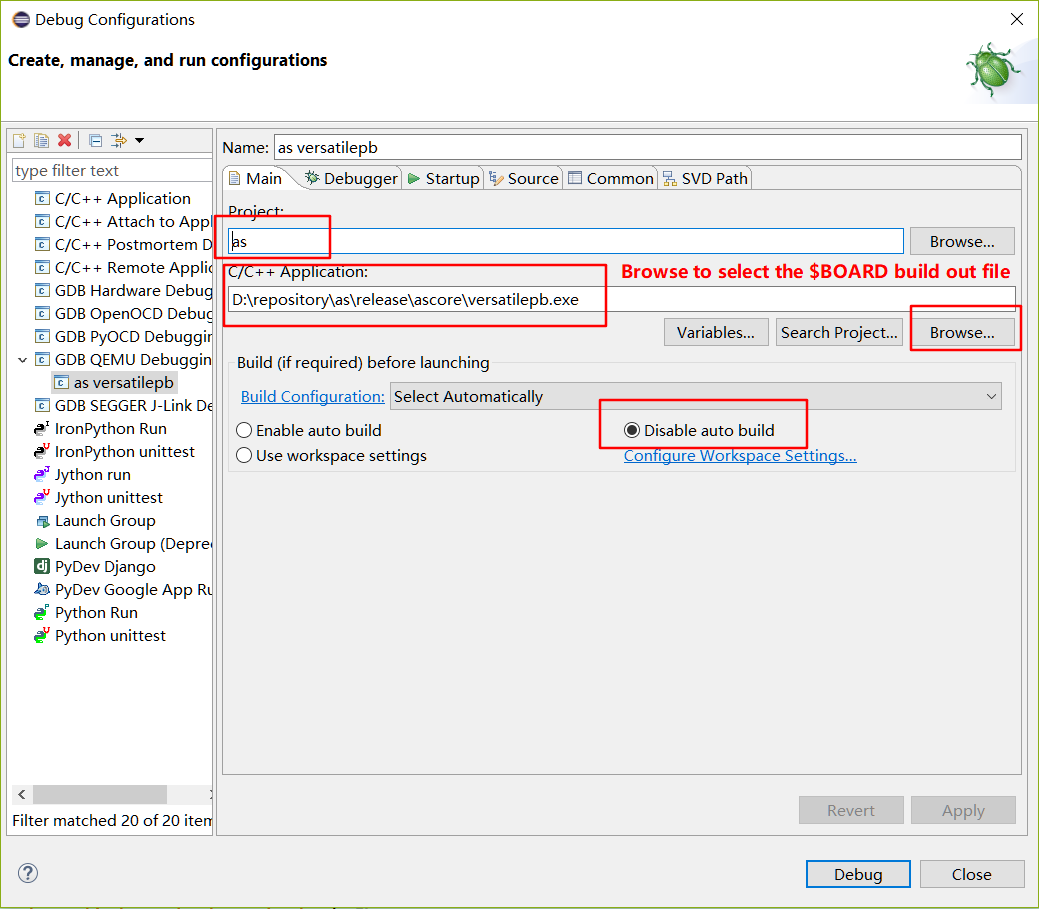
3.7.2 make sure the eclipse has installed the plugin “GNU MCU C/C++ QEMU Debugging”, and then follow below steps to start the debug.
New a qemu debug configuration, and as showed by below picture, click “browse” to select the build out target(*.exe) under directory “/as/release/ascore”.
And then follow below pictue, “browse” to select the $BOARD related gdb. For ARM, select the “/as/release/download/gcc-arm-none-eabi-5_4-2016q3-20160926-win32/bin/arm-none-eabi-gdb.exe”. Fox x86, just select the “/usr/bin/gdb”.
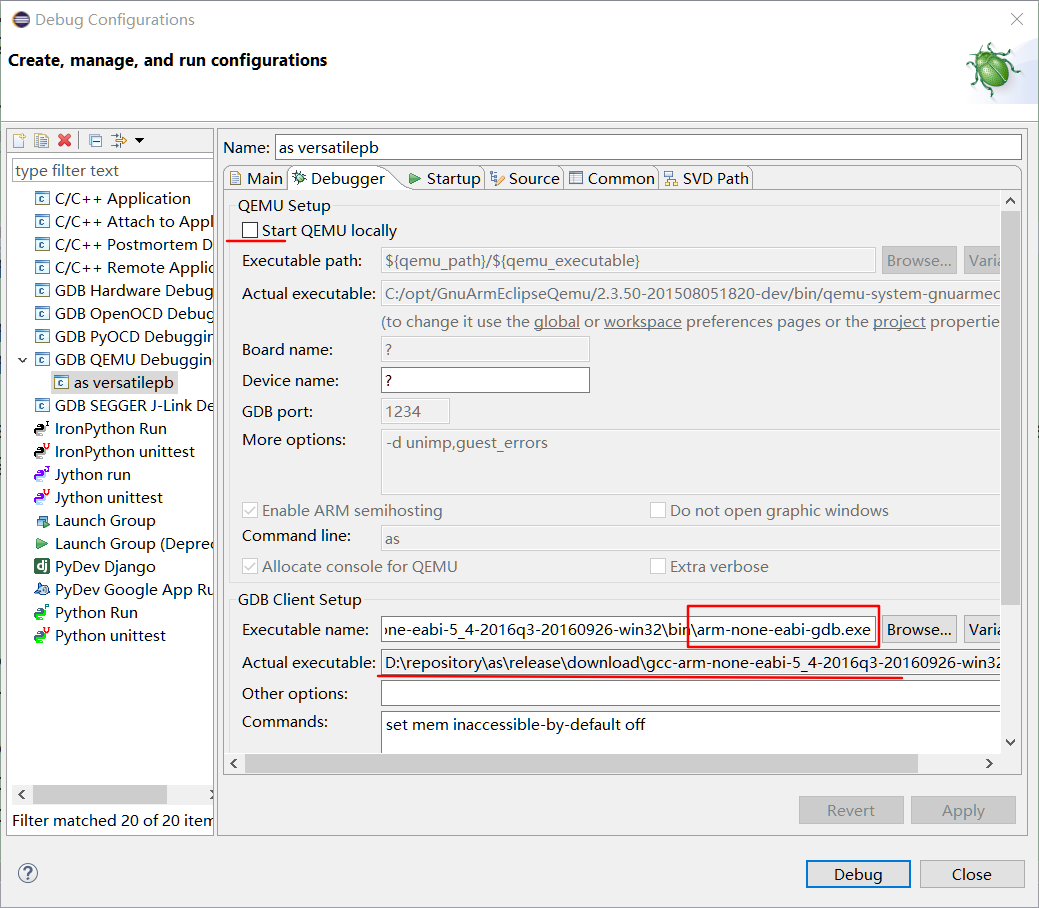
Then click the button “Debug” to start debug.
4. as.one.py - a powerful pyhton tool
The as.one.py is a very powerful python tool has integrated a lot features, such as BOOTLOADER, Diagnostic Communication Control(UDS iso14229) on CAN, DoIP(ethernet) or XCP(Universal Calibration Protocol).
For the purpose to use it, it must compiles the astool/aslib firstly to build out the necessary library AS.pyd(this is generally for CAN).
set BOARD=any
set ANY=pyas
scons --menuconfig
scons
4.1 notes if menuconfig pyas to enable peak CAN and ZLG CAN
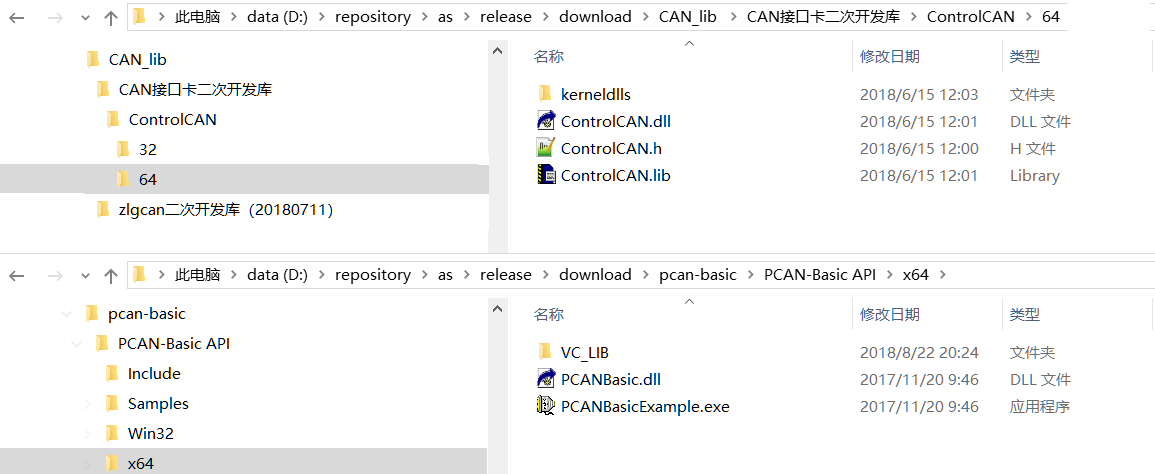
The third party CAN library should be downloaded, such as the peak-can pcan-basic.zip and zlg-can CAN_lib.rar. But this 2 libraries maybe updated in the future by the vendor maybe for the purpuse to add new features or fix some bugs, it may result that the automaticlly downlowded one by the aslua/Makefile will not be usable if the CAN library file structure changed, or even download failed. I am not going to fix those issues resulted by the third party CAN library file structure changed in time, so you should generally make sure the CAN library located at the as/release/download folder as below file structure.
And for the zlg can, the VC 2008 Runtime X64 or the VC 2008 Runtime X86 should be installed.
Then in the panel of “ascore”, run the command “scons run asone” to run with the tool as.one.py also started or just in the panel of “as.one.py”, run command “python main.py”.
That’s all! Have Fun with AS.
5. Others Envs
5.1 WSL ubuntu 16.04
- Note: the lwip is not supported on WSL as WSL ubuntu has no support of TAP device.
5.1.1 install WSL and X server
5.2.2 better to use putty to ssh to WSL
5.3.3 execute below commands to setup build env
sudo apt install scons gtk+-3.0 autoconf libtool-bin python3-sip python3-sip-dev sip-dev python3-pip flex bison gperf \
  libncurses-dev nasm gnome-terminal gcc-arm-none-eabi libreadline-dev python3-pyqt5 glib2.0 libcurl4-openssl-dev
sudo pip3 install pillow pyserial bitarray
5.2 Windows 32bit
Just give some commands, up to your ability to set it up.
First of all, the 32 bit Anaconda should be installed
pacman -S mingw32/mingw-w64-i686-gcc